Thursday, June 4, 2015

Deploy shared library without Application downtime


Recently I came across blog post from Andreas Koop who explained very well how Application downtime can be avoided if we use Shared library approach.

Refer to his post:

http://multikoop.blogspot.com/2013/06/production-redeployment-with-adf-shared.html


http://multikoop.blogspot.de/2013/06/weblogic-application-redeployment-using.html

When you want master application to refer latest shared library reference, just select the master application & click on "Update" to pick new shared library changes


On top of this, I would like to clarify when you need to make entry in weblogic.xml versus weblogic-application.xml

weblogic.xml: All your web shared library references goes into this file. If you try to refer a library that is not a web library then you will get exception as below:


weblogic-application.xml: Rest all java library references goes into this file. If you try to refer a web shared library then you will get exception as below:


Feel free to comment.

Friday, May 29, 2015

Overriding standard component messages - Part 2


In this blog I will show you approach to figure out standard component message bundle key. Refer to Part -1 to get understanding of how I have overridden default uncommitted data warning message.

Now to figure out the bundle key, you need to follow below steps.
While your application is running in browser:

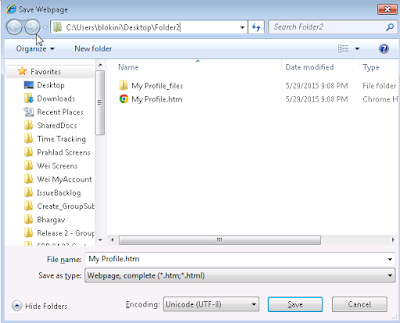
Go to File->Save As->Webpage, complete (*.htm,*,html)


Now, go to the folder where you saved the webpage. Open the folder & open file starting with: AdfTranslations-xxxx.js


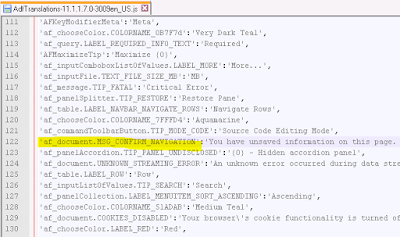
You can search for the text that you wish to override & locate the corresponding bundle key.


That's it, now you use this key in your skin bundle(Part -1) to override the message.

Overriding uncommitted data warning message - Part 1


I'm sure you might be knowing about uncommitted data warning message you get, when user tries to navigate out of current page without saving the data. Refer Oracle & Ashish post for more details.


Today, I'm going to show you how you can override standard message displayed in this popup.

Expand your ViewController project & open the trinidad-skin.xml file


I defined a new Java resource bundle for my skin, you can also specify a .properties or xlff file.
Then created a Java file as below:


If you notice, I'm extending from ListResourceBundle & then overridden a key called af_document.MSG_CONFIRM_NAVIGATION

That's it, you can run your application now & see this new message being displayed when you get uncommitted warning message.


Refer Part -2 to find out how to locate the default key that needs to be overridden.

Hope this helps!!!

Thursday, May 28, 2015

Hudson Build & Deployment Script - Part 1

In Part1, I'm going to talk about how to install & configure hudson continuous integration server.

Hudson Installing & Configuration:
Install Hudson as windows service (will work only if the svn is server based. Won’t work for file based svn)
  1. Download latest hudsonxx.war from here & start the Hudson server as: java -jar hudsonxx.war
  2. Make sure you have Java set in classpath wherever the Hudson server is running. Next time you will notice Hudson is started as a service. For file based SVN, remember to start the Hudson serer as: "java -jar hudsonxx.war" instead as a service, otherwise Hudson won’t recognize the file based svn URL. In case the SVN is a server based, then you can use Hudson as service.
  3. Refer to system configuration below. Remember to install plugin for subversion from Manage Hudson->Manage Plugins->Available (tab)->Featured-> Hudson Subversion Plug-in & install
Refer installed plugins below. You can install additional plugins for your use case. Some of the below may be not required.


  1.  Refer below screenshots for system configurations.

System Configurations:


  1. Create a new Job & name it whatever you want. Click on Configure to configure the parameters for the Job

In the sample job below, I defined this build to be parametrized. This way I'm making my job flexible. If you notice, I also defined a 'CODE_REVISION' & 'MANIFEST_BUILD_VERSION' parameters below to take care of triggering build for a specific code revision. We will look at how these parameters are utilized in build script in Part 2.
 
Optionally for secured access for a team, configure security.
You & whoever wants to control build environment for this job would need to create account to be able to manage the job.


You can also create a batch file to be run whenever machine starts by
  1. Create batch file with command:
"C:\Program Files\Java\jdk1.6.0_37\bin\java" -jar C:\Oracle\Hudson\hudson-3.1.2.war

  1. Now copy above Hudson startup batch & startWeblogic.cmd file in windows startup folder.

For creating a ojdeploy based build script for your application proceed to Part-2

Hudson Build & Deployment Script - Part 2


If you have not followed Part 1, please go back & follow steps to install & configure Hudson CI on your machine.

Assuming now you have configured Hudson server. Lets see how you generate ojdeploy build script for your application. I will take example of SRDemo application & also show you example of how you handle third party library dependency resolution.

Creating build script for ADF project
  1. While the workspace is open, click on New, then choose Ant->Application Build File. This will ask for location & make sure you check option: “Include Packaging Tasks (uses ojdeploy)”
  2. Modify the properties file to include your Jdev installation directory.
For example, my build & properties files would like below:
build.properties:

build.xml:


If you notice, in above build.properties file I'm using the build parameters I set in Part 1.
If you application have third party library references, you can replace them using replace commands. You can specify additional parameter in your hudson job to refer to location of third party libraries. Refer to build.xml target "replace-library-references"
So before you package your application ear, you will replace library references & then build the ear. Now lets see how you will configure hudson job.


If you notice the last Ant task where we specify the relative path of build.xml file and the most important order of targets to run from the build file, "deploy-all", "uninstall" and finally "install". This will run all the targets & create required application artifacts in specified DEPLOY_LOCATION path. 
Notice I also used MANIFEST_BUILD_VERSION parameter for building & deploying different implementation version of shared library/application.
For this you need to create a MANIFEST.MF file at location:
SRDemoUI/src/META-INF/ MANIFEST.MF


Running the build script locally from Jdeveloper:

You can also run the build script locally for testing the application. You need to change below parameters in order to make it work.
  1. Before line basedir=${WORKSPACE}, add one more line on top to define  WORKSPACE = <<your application workspace location>>. For e.g c:\mywork\SRDemo
  2. Specify your middleware home location by adding line JDEV_LOCATION = <<oracle middleware home location>>. For e.g c:\oracle\middleware1117
  3. Specify deploy location by adding line DEPLOY_LOCATION = <<deploy location>>. For e.g C:\DeployFolder
  4. Specify CODE_REVISION svn revision number you want to build
  5. Specify value for MANIFEST_BUILD_VERSION. You can leave it to default if you do not wish to update the implementation version of your deployed application.
Now right click the build.xml file from application resource navigator & select the target to run
.
Feel free to comment & let me know if you face any issues.

Monday, May 25, 2015

ADF Technical Document Generator


Let me admit, most annoying part of full development life cycle is when I need to write Technical documentation. To avoid this recurring task(boring as well ;)...) I created Technical document generator utility. Thanks to my colleagues(Prahlad & Raj) who also contributed to this work.
I'm sure even they would appreciate writing a blog on this task.

Let me be clear what you will get with this utility.
It would list down;

  1. All the model artifacts, e.g Entity object, view object, application module ,package structure, class files.
  2. All(almost all) validation rules defined on entity objects.
  3. View accessors & list of values defined on an entity/view objects.
  4. Entity/View object attributes, any expressions defined over them.


No software/utility is perfect & cover all the scenarios. So you may need to modify & use as per your requirement. But this blog should give you fair enough idea on how to get around them.

Steps to uptake this utility:

  • Create a temporary application module & add all the view objects in the application.
  • Generate AMImpl for the temporary application module.
  • Copy paste code below.
  • Expose client interface methods writeAllEntityObjects & writeAllViewObjects.
  • Run them directly from Application module tester.
  • All your code is generated in server console. Copy code to a file & save as html.
Hope this helps!!!

Controlling View Criteria Hints At Runtime


I came across a requirement where in I need to control view criteria hint(Display/Hide) based on logged in user or some user parameter.

I will now discuss & show a reusable way of controlling at a single point.


Model:


In EmployeeVO, I have defined a view criteria for employee search as below.


Department Id is a list of values defined on DepartmentVO.
I will show case here how to control display of DepartmentId LOV based on logged in user role.
I created EmployeeVOImpl & overridden below method: 


If you notice, getCriteriaItemAttributeHints calls a Util method to determine whether to display/hide view criteria item based on logged in users role. If user is in role "super-user" then the Department Id LOV is displayed otherwise hidden.
For testing purpose, I enabled security in application & defined two test user & roles as below.


Now when I login as user barber, I don't see the Department Id LOV:


If I login as scott, I do see Department Id LOV:


Hope this helps!!!